Introduction
Are you tired of the same old color on your favorite leather shoes? Do they feel outdated or simply not suit your current style? Dyeing leather shoes might just be the perfect solution! This comprehensive guide will walk you through the entire process—from prep to the final touch—ensuring you have all the information you need to give your footwear a fresh new look.
Whether you’re a shoe enthusiast, fashion lover, or business owner in the footwear market, this article is tailored for you. We’ll cover materials, techniques, tips from the pros, and even real-life experiences to help you achieve your desired outcome.
Why Dye Leather Shoes?
Leather shoes are an investment, and with the right care, they can last for many years. However, styles change, and colors fade, which can leave you wondering what to do with your beloved pairs. Dyeing can breathe new life into your shoes, allowing you to:
- Rejuvenate worn shoes
- Customize your footwear to match new outfits
- Transform a classic pair into a trendy statement piece
Materials Needed for Dyeing Leather Shoes
Before diving into the dyeing process, it’s essential to gather all necessary materials. Here’s a comprehensive list:
- Leather dye (choose water-based or alcohol-based depending on your preference)
- Leather preparer (deglazer or alcohol wipes)
- Applicators (sponge brushes, daubers, or spray bottles)
- Protective gloves
- Old newspaper or plastic to protect your workspace
- Sealer or finisher (optional but recommended)
- Conditioner for leather (after dyeing)
Step-by-Step Guide to Dyeing Leather Shoes
Step 1: Preparation
Preparing your shoes is crucial for a successful dye job. Here’s what you should do:
- Clean the shoes thoroughly to remove dirt and grime.
- Remove laces and any hardware that may obstruct dye application.
- Test a small, less visible area for color compatibility.
- Use a deglazer or alcohol wipe to remove any existing finish or oils.
Step 2: Dye Application
Now that your shoes are prepped and ready, it’s time to apply the dye. Here’s how:
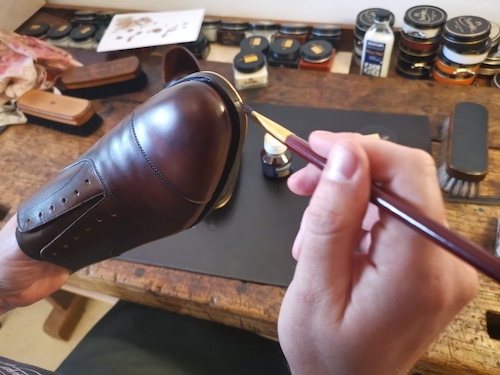
- Choose your applicator based on the type of dye. Sponge brushes work well for larger areas, while daubers are good for detailed work.
- Apply the dye in thin, even layers. It’s better to do multiple coats than to apply one heavy layer.
- Allow each layer to dry before applying the next. Depending on the dye and environmental conditions, this may take anywhere from 30 minutes to a few hours.

Step 3: Finishing Touches
Once you’re satisfied with the color, it’s important to seal and condition your shoes:
- Apply a leather sealer for durability and protection.
- After the sealer is dry, condition the leather to restore its softness and prevent cracking.
- Reattach laces and allow your shoes to rest overnight before wearing them.
Tips for Successful Dyeing
Here are some expert tips to ensure your dyeing project is a hit:
- Always work in a well-ventilated area to avoid inhaling fumes.
- Use gloves to protect your hands from stains.
- Choose a dye that matches your desired final color accurately.
- If you’re unsure, start with a less intense dye and build up gradually.
- Keep a sample of the dye for later touch-ups.

Case Studies: Real-World Experiences
Case Study 1: Emily’s Red Pumps
Emily had a pair of classic black pumps that she adored but felt they were too plain for her vibrant wardrobe. After researching the dyeing process, she chose a red dye:
“The process was straightforward! I followed each step carefully and the results were stunning. My shoes now match almost every outfit I own!”
Case Study 2: Josh’s Vintage Boots
Josh owned a pair of vintage brown leather boots that had lost their luster. Instead of tossing them out, he decided to dye them a rich mahogany:
“I was hesitant at first, but after watching some tutorials and gathering my materials, I went for it. The boots look brand new and stylish! Highly recommend diving into this project if you’re on the fence.”

Pros and Cons of Dyeing Leather Shoes
Pros
- Cost-effective way to refresh your footwear.
- Personalization of shoes to match your style.
- Can extend the life of old shoes.
Cons
- Requires time and effort; not a quick fix.
- Risk of uneven color or damage if not done correctly.
- Dye might fade over time, requiring future touch-ups.

Comparison of Popular Leather Dyes
| Dye Brand | Type | Color Range | Price | Rating |
|---|---|---|---|---|
| Fiebing’s Leather Dye | Alcohol-based | Wide | $9.99 | 4.5/5 |
| Angelus Leather Dye | Water-based | Extensive | $7.00 | 4.8/5 |
| Rit Dye | Powder | Varied | $3.49 | 4.2/5 |
Frequently Asked Questions
1. Can you dye suede leather shoes?
Suede can be dyed, but it requires specific suede dyes and methods. Always test on a small area first to check compatibility.

2. Will dye change the texture of my leather shoes?
While dyeing can alter the finish, using the correct products and methods can minimize texture changes.
3. How long does the dye last?
The longevity of the dye depends on the product used, the wear of the shoes, and how well they’re cared for post-dyeing.

4. Do I need to seal my shoes after dyeing?
Yes, sealing helps protect the color from fading and enhances the finish of the leather.
5. Can I dye shoes that have been polished or conditioned?
It’s best to remove any polish or conditioners before dyeing, as they can affect color absorption.

6. Is dyeing shoes a permanent change?
While dyeing is a long-lasting option, it’s not entirely permanent. Fading or wear can necessitate touch-ups.
7. What if I don’t like the new color?
If you’re not happy with the result, you can attempt to re-dye the shoes in a different color, or strip the dye off and start over.
